Edition 5 of “This May Be a Dumb Question, but…”

This Blog Series is written by Exertis Almo's Business Development Managers: 
Ashley Nichols, CTS, DSCE, and John Borns, CTS, DSCE.

If you’ve been following along with our blog series for the past few months, you may have been led to believe that the only questions we ever get are related to projection systems. Who could blame you? You’ve obviously read 3 straight issues of our critically acclaimed mini-series on projection (edition 2, ed 3, and ed 4). Well, I hate to break it you like this, but you’d be wrong. We get all sorts of questions – and maybe you shouldn’t go around assuming things so much. 🤣 Maybe we shouldn’t have dedicated 80% of our blogs thus far to 1 topic. 🤔 There’s no way to know for sure. Anyway… Today, we’re going to talk about AV racks! Another seemingly mystifying part of the AV ecosystem that we’re going to try and make sense of for you.

QUESTION

John, Are these rackshelves/lacing bars/drawers compatible with my rack?
or… John, I have 8 pieces of gear. What size rack do I need?
or… John, How do I know if these pieces of gear will fit in my rack?

ANSWER

These may appear to be different questions, but in actuality, they all stem from not knowing the same basic principles about AV racks. Questions like these are very near and dear to Ashley and me, because we asked a lot of these questions when we first started working together at Middle Atlantic Products many moons ago. We totally remember what it was like trying make heads and tails of how racks work and how everything goes together and what goes where. It wasn’t until a kind soul (shout out to Jason Pavia!) came along and totally bailed us out and taught us how everything works. The beauty about racks is that they are actually very straightforward because there are rack STANDARDs in place.

Firstly, let’s talk about the width of the rack1. Every rack (as far as I know) is 19” wide between the rails. So, anyTHING that wants to be rack mountable is going to conform to that width. Power strips, amps, shelves, mixers, you name it – they’re all going to be that width (or have some additional rack mount hardware that allows to it to cover that space). You pretty much never need to worry about whether or not something will fit into a SPECIFIC rack, because all racks are same size.

The second thing to know is the RACK UNIT2 (or RU as it’s more commonly referred to). A rack unit is always 1.75” high…but that doesn’t really even matter, because everything that is going to be mounted onto a rack must confirm to a solid RU measurement. So those amps, power strips, drawers, etc., that we mentioned above, are all 1 RU, 2 RU, 3 RU etc. So, knowing all of that, you can confidently assume that all of your rack mountable gear will fit in whatever rack you end up going with AND you can determine how tall of a rack you need by simply knowing how many pieces of gear you’re putting in there and how many RUs they occupy.

The last thing consider is the depth of the rack3. This is where the standards sort of dry up. The main thing to concern yourself with here is the depth of your DEEPEST piece of gear. You pretty much just need to make sure that it’s deep enough to accommodate that one piece, with a little extra room for cables and air flow. So, if you have a 20” deep UPS, you’ll probably want to get like a 24” deep rack.

QUESTION

How do I know which type of rack to choose? Wall-mounted? Gangable?
Why would someone need one vs the other?

ANSWER

I’ll admit that no one has asked me this question exactly, but it is an amalgamation of a general overwhelming feeling people have when trying to start looking for a rack. There are a TON of options out there and knowing which ones to use and when can feel intimidating at first. This is really where understanding the needs of the system and users is critical. Most racks are built with a certain type of application in mind. Let’s hit on a few of the common ones and why people would want to consider them.

wall-mountable rackWall-Mounted Racks – There a few different uses here. Mainly, if you have smaller rack need…something like 8-10 RUs….it may be easier to access the gear for use or service by having it hanging off of the wall at eye level. Bending down or kneeling to get to the gear can be an unwanted nuisance, especially if the gear is being accessed routinely. Additionally, maybe you want to keep the gear away from small people with bad intentions – kids. Wall-mounted racks are used in classroom applications. Also, simply having the rack secured to the wall can save space in some locations and may help keep a cluttered closet a little more organized.

Gangable5 Racks – This is really just a way of describing racks that can be fixed to one another in a row. If you’ve ever infiltrated a high security data center to get access to the heavily guarded corporate secrets, then you’ve undoubtedly seen a bunch of server racks “ganged” together. This allows for multiple racks to sort of operate as one larger unit, allow for cables to pass more easily between one another, save space, etc. Additionally, maybe you have a small system now, but one to potentially expand in the future. Getting gangable rack will allow your system to be scalable…to expand into a second rack down the line.

AV rack2-Post Racks vs 4-Post Racks – Generally speaking, in AV applications, you won’t commonly use 2-posts racks. These are typically used in network-based applications with thinner patch panels and lots of wire management needs. 4-post racks are sturdier and can handle heavier AV gear like your amplifiers, DSPs, Mixers etc. Also, 4-posts racks can be more easily built into larger cabinets, which gives them additional options that may improve your system. Speaking of which…

Other things to considerSecurity, thermal management, additional storage, etc. I’m certainly not going to be able to do these additional considerations justice. Racks that can have fully welded side panels, and lockable doors are much secure than those that don’t. Some racks are better equipped to manage the heat in the rack (which is critical to control if you want to preserve the life of your gear). Some racks have more room inside the cabinet, or can accommodate special accessories, making it much easier to mount small devices and power strips. Knowing which of these features are critical for your project will help guide you towards the right rack. Luckily, we’re here to help guide you if you need some help!

Vocab Test Time!

Are these the most detailed definitions? No – we are not a dictionary, nor the AVIXA CTS Prep book. Will someone message us after still telling us how much we missed? Possibly. Will these get you a basic working knowledge of these terms and why they matter? We hope so. Plus, we are 99% sure they will help you impress your grandparents when you reset their WIFI. 🤔

  1. Width of rack – always 19”, doesn’t matter the rack.
  2. Rack Units (RUs) – 1.75” per rack unit. Describes the height of a rack and rack mountable gear.
  3. How deep is your rack – Make sure it’s deeper than your deepest piece of gear.
  4. How deep is your love? – I really need to know…
  5. Gangable – Racks that can be easily connected together.

Thanks for Reading and Asking Your Questions!

Do you have more ‘dumb’ questions? Share your questions here and we will get you an answer.

Did you find this blog post helpful? Connect with us and #TeamExertisAlmo over on LinkedIn.

Ashley Nichols, Dir BizDev

Ashley Nichols | CTS, DSCE

Director of Business Development

Supported Manufacturers: Sony

John Borns, BDM

John Borns | CTS, DSCE

Business Development Manager

Supported Manufacturers: Legrand AV (NE, SE, MW) – Chief, C2G, Da-Lite, Luxul, Middle Atlantic, Vaddio, Wiremold

5 Keys to Selecting a New Projector

Five Things to Consider When Selecting a New Projector

When it comes to producing large displayed images of 100” or more, projection technology is the front runner when it comes to cost, ease of installation, and system maintenance over time. While projector brightness is a key consideration, it is not the only factor you should be looking at when selecting a new projector. Here are some others that I recommend you should be looking at:

1. Projection Technology

If you have been in the industry for over a decade, you likely remember regularly being asked the question, “What’s better, plasma or LCD?” We no longer have that choice since the extinction of plasma displays, however, with projectors, we do have choices in the type of technology. The most common types of projection technology are 3 LCD, 1-Chip DLP, and 3-Chip DLP, with LCoS as a less common option for commercial projectors. While both are perfectly acceptable, 3 LCD typically will produce more vivid saturated colors and DLP may produce “blacker” blacks. Most noticeably with 1-Chip DLP, because of the color wheel, the brightness or lumen output when producing color images will often be significantly lower than the specified lumen rating. 3 LCD projectors will output the full specified brightness whether projecting full white or full color images. For more detailed information regarding color brightness, check out this article.

2. Resolution & Aspect Ratio

With projection, you have three common native aspect ratios to choose from (4:3, 16:9, and 16:10). According to PMA Research, over 75% of projectors sold have a native aspect ratio of 16:10, the majority of which are WUXGA with the remaining at WXGA. Additionally, they report that roughly 20% are native 16:9, with the majority being 1080p and a relatively small segment that are native 4K. This means there is still, albeit small, a percentage of native 4:3 projectors being sold. The important thing to remember here is that you want to match the aspect ratio of your screen to the native aspect ratio of your projector. Whether you are retrofitting a new projector to an existing screen, or installing an entirely new system, you need to be mindful of this. Also, be aware of the source signal you will be sending to the projector, especially if you need to display a 4K signal. While native 4K commercial projectors are expensive and choices are limited, there are many options that are native WUXGA (1920×1200) that support a 4K signal with pixel shifting technologies, like 4K enhancement.

St Eds theater Epson3. Image Position & Adjustment

in a perfect world, you would not have to worry about projector placement relative to the projection screen, however, things like light fixtures and HVAC systems can prevent you from installing the projector dead center of screen. While most projectors offer horizontal and vertical keystone correction, you sacrifice some image quality when using this. A better option is to use a projector that features lens shift, so that the image can be repositioned horizontally and vertically without any digital manipulation of the image.

4. Throw Distance/Projector Placement

the projected image size will be determined by the available distance or “throw” you have in a particular space between the front of the projector lens and the projection screen surface. Unless the projector you are considering offers interchangeable lenses, as your desired image size increases, so does the required throw distance. A key specification of any projector or projection lens is the throw ratio. For a zoom lens, this is expressed as a range of two numbers representing distance compared to the number one, which represents your image width, for example (1.35-2.20:1). In this case, this specification states that the throw distance can range between 1.35 x the image width up to 2.20 x the image width. For a 10ft wide image, the throw distance then can be anywhere between 13.5ft – 22ft. It will be important to understand any limitations regarding projector placement relative to the screen and to choose a projector that will meet those requirements.

5. Connectivity

This may seem like a no-brainer since the majority of sources are now HDMI and pretty much every projector will include at least one HDMI input, however, in many cases the projector will be mounted just below the ceiling in the middle of a room. This could be a considerable distance away from the video source. Often, for cable lengths beyond 50ft HDBaseT HDMI extenders are used to send the audio, video, and control signals a long distance over a single Cat6 cable. Selecting a projector that includes an HDBaseT input can save you money on the extension hardware, simplify the installation, and reduce points of failure.

Whether you are looking to provide large images for a house of worship, create interactive experiences in classrooms, incorporate projected images into a presentation stage, integrate a command and control center, or deliver just about any type of large displayed visual image, a projector exists to get the job done.

What other things do you look for when specifying projectors? Let me know over on LinkedIn.

Brian Rhatigan headshot
About the Author

Brian Rhatigan | CTS, DSCE

Director of Business Development

Supported Manufacturers: Epson, Huddly, Kramer, Jabra

Edition 4 of “This May Be a Dumb Question, but…”

This Blog Series is written by Exertis Almo's Business Development Managers: 
Ashley Nichols, CTS, DSCE, and John Borns, CTS, DSCE.

Welcome to our 4th and final issue focusing on projection topics. The most commonly asked questions we receive to have do with determining screen size, throw ratio, and brightness. We’re going to attempt to tackle those here today. To get here, we first wanted to make sure that you were knowledgeable enough to be dangerous when it comes to picking out screens and determining which TYPE of projector you need. If you’re coming in late on this, see our previous posts – edition 2 or edition 3WARNING: This may take a teensy bit of math, so get out your scratch paper!

FIRST UP: We need to understand aspect ratio.(1)

Simply put, aspect ratio is the relationship between the width and the height of a screen. It’s critical to know this so that we can ensure that the shape of projected image fits neatly within the screen. Every projector has a native aspect ratio, so ideally, you can pair a screen and projector with this information. Fortunately, this isn’t too much of a challenge, as MOST modern professional projectors can be programmed to support all sorts of aspect ratios. Why is this? Basically, the projector needs to be able to support anything you plug into it (computers, Blu-rays, you name it). Additionally, projectors don’t have the same lifespan as screens, so it’s very likely that you will need to match a new projector to an old screen. If someone took down the old projector and punted it into the sea before you had chance to know what it was, you can confidently install a new projector and trust it can adapt to the screen. Below are some common aspect ratios, and more specifically, the most common aspect ratios you will see in projection are 16:9, 16:10, and occasionally still a 4:3. The others are more commonly seen in LCD’s, gaming monitors, IMAX, etc., so we will ignore them for now.

ASPECT RATIO POSSIBLE RESOLUTIONS OTHER FORMS YOU WILL SEE
32:9 3840×1080, 5120×1440, 7680×2160 DFHD, DQHD, 32:9, DUHD
21:9 2560×1080, 3440×1440, 3840X1600, 5120×2160 21:9 Ultrawide
16:9 1280×720, 1366×768, 1600×900, 1920×1080, 2560×1440, 3840×2160, 5120×2880, 7680×4320 HD, FHD, 4K UHD, 8K UHD
16:10 1280×800, 1920×1200, 2560×1600 WUXGA, WXGA, WQXGA
4:3 1400×1050, 1440×1080, 1600×1200, 1920X1440, 2048X1536 XGA, SDTV

*Note: ‘other forms’ does not encompass all possibilities, just some of the most common forms

To calculate Aspect ratio when you aren’t sure what you have, the formula is Width divided by Height (W/H=AR). For example, pretend you have a screen that you measure and it is 125” wide by 70” high. 125” divided by 70” is 1.777. BEFORE you say, “Ashley, that is NOT on this list of aspect ratios!”— here is a handy tool to convert to nomenclature that is more common:

ASPECT RATIO ALSO ASPECT RATIO
16:9 1.78:1
16:10 1.6:1
4:3 1.33:1
21:9 2.33:1

These calculations MEAN the same thing: for every 16 units wide, there are 9 units high, or for every 1.777 units wide, there is 1 unit high. If you’re using an old fashioned calculator on your desk instead of some of the calculation tools out there on the World Wide Web, then you will see these decimals and can easily convert over to the more commonly used terms on the left.

SECOND UP: Throw ratio.(2)

Why do you need this? Well, if the aspect ratio is making sure you have the right shape of screen, the throw ratio will help make sure you have the right lens on the projector in relation to where you are mounting it, so that your image fills the screen to your liking. To calculate the throw ratio, you divide the distance from the projector by the width of the screen (D/W=TR). For example, you have 10.42 ft wide screen and you are mounting this bad boy 15ft away, you take 15ft/10.42ft= 1.439. Your throw ratio is 1.44:1, and you find the lens that fits that.

An important reminder is to make sure that you convert feet to inches (or vice versa) when doing your calculations. I’m commonly ask to recommend a screen for 125” wide screen that’s being mounted 15’ away. It would not look great for me to recommend a 1875:1 lens here – which is what you get if you don’t convert 15 feet into 180 inches. More commonly, I get requests such as, “I want to use XYZ projector, I have 164-inch diagonal screen and am mounting this 15ft away: which lens do I need?” I don’t know the width, but I do know the diagonal, so I can either ask for the width to be exact, or I can head over to this tool: http://screen-size.info/, pick out the Aspect Ratio, and find the width. If they give you another bit of info, like the height, then you can dig in the recesses of your brain and use the Pythagorean Theorem to manually calculate the width, but around here, we work smarter, not harder, so feel free to use the cheater tool.

LAST, not least (& probably the most difficult to calculate): How bright do I need my projector to be?

Why do I say this is harder to calculate? Because there are a lot of different variables in the room that affect the ability to see an image, and also, it’s subjective. If you have great eyes and can see the image just fine but someone who struggles a little more can’t make out the details, then that projector probably isn’t bright enough for the space or is even too bright (see Washout from edition 3), even if you think it is fine. There are general standards out there that can be adhered to, though, so we will go over those here briefly and you can build on that knowledge later with more research, if you want. If you read editions 2 and 3, then you have heard us say that projector brightness is measured in Lumens. You may see ANSI Lumens or Center Lumens, and these can be different numbers. Why is this? ANSI Lumens are defined by the American National Standards Institute, and “measures the overall amount of light the projector delivers.” Center Lumens just measures the “center spot,” which is likely the brightest spot on the screen, since no projector can deliver uniform brightness across the entire screen, so “center lumens” is likely a higher number than ANSI lumens. I wouldn’t say that one is better than the other, and neither can the industry at large, because you will see different people duke it out over why they prefer one to the other, but just note that they are different.

Ok, so, where am I going with this? You just want to know how bright the projector needs to be, and I’m giving you a vocab test. Well, bear with me, because here is one more term that I need you to know, and that is Foot lamberts. 👣 Yes, this is a real term. Once you’re finished chuckling, here is why you need to know what they are: these help you determine if the placement of your projector creates a viewable image in your room. By following these guidelines, you can determine if you are going with the 5,000 lumen projector or the 7,000 lumen projector. To do so, the formula is (Projector Lumens ÷ Screen Area) x Screen Gain = ftL

FOOT LAMBERTS AMBIENT LIGHT EXAMPLES
16 – 29 Dark Room Home theaters
30 – 39 Low Ambient Light Darkened rooms, no windows, etc.
40 – 59 Medium Ambient Light Classrooms, well-lit conference rooms
60+ High Ambient Light Auditoriums, lecture halls, etc.

The previous chart will help you determine if you are in the right ball park for brightness. Let’s pretend you have a 220” screen with 1.0 gain (see edition 2 where John talks about screen gain) in a lecture hall, and you got a great deal on a 7,000 lumen projector. Will it work? (7,000 lumens / 150sq.ft ) x 1.0= 47 ftL. Assuming the auditorium is well lit and has a lot of ambient light, this is probably NOT a good fit for the space. Something in the 9,000 lumens or more range would be better suited because it is 60ftL or more.

There are handy calculators out there on the web to assist you in this math so you don’t have to keep doing it yourself, but the next time someone comes to you asking for a suggestion, if you have bits of this info, you can help narrow down their search, and more importantly, be the hero!

Vocab Test Time!

Are these the most detailed definitions? No – we are not a dictionary, nor the AVIXA CTS Prep book. Will someone message us after still telling us how much we missed? Possibly. Will these get you a basic working knowledge of these terms and why they matter? We hope so. Plus, we are 99% sure they will help you shave a few strokes off your golf game. ⛳

  1. Aspect Ratio – the relationship of the height and width of your image (i.e. 4:3, 16:9, 16:10). Essentially, describes the shape of the screen.
  2. Throw Ratio – the relationship of the distance from a projection screen and the width of the screen. If you have these two pieces of information, you can easily calculate your throw ratio to determine which projector lens you need if a manufacturer doesn’t have a lens calculator on their website.
  3. Foot lamberts – Yes, this is a real measurement. Essentially, it is a unit of measurement used to determine how bright you need your projector to be. If you want to get more technical, it is equal to one circular candela per square foot (if this seems like a silly term, take it up with the Society of Motion Picture and Television Engineers who use it).
  4. Frank Lambert – Patriarchal figure in the Emmy Winning show ‘Step by Step.’

Thanks for Reading and Asking Your Questions!

Do you have more ‘dumb’ questions? Share your questions here and we will get you an answer.

Did you find this blog post helpful? Connect with us and #TeamExertisAlmo over on LinkedIn.

Ashley Nichols, Dir BizDev

Ashley Nichols | CTS, DSCE

Director of Business Development


Supported Manufacturers: Sony

John Borns, BDM

John Borns | CTS, DSCE

Business Development Manager


Supported Manufacturers: Legrand AV (NE, SE, MW) – Chief, C2G, Da-Lite, Luxul, Middle Atlantic, Vaddio, Wiremold

Edition 3 of “This May Be a Dumb Question, but…”

This Blog Series is written by Exertis Almo's Business Development Managers: 
Ashley Nichols, CTS, DSCE, and John Borns, CTS, DSCE.

Welcome back to the 3rd installment of “This may be a dumb question, but…” In Edition 2, we began exploring the vast world of projection and it’s many facets, but specifically, we went over the differences in Laser vs. Lamp projection, as well as the foundation for choosing the best projection screen, so if you want to start there, here is a link to Edition 2.

Since projection has so many layers to picking the right solution, we are going to continue drilling down. On to the questions!

QUESTION
What is the difference between all the different projector technologies? I see 3LCD, DLP, LCOS, Laser, Lamp, etc., and I don’t understand what the difference is and when to use them.

ANSWER

In every technology installation, it is important to know the full scope of what your client is trying to accomplish. Seems simple, but you would be surprised how often the details do not come with the request. It’s not just about if you can rattle off all the projector specs. What sort of experience do they want? Do they need color accuracy because they need the best possible picture? Are they just looking at random power points and are looking for a budget option? Is it in a setting where they need a very quiet projector? There are MANY more questions involved in this decision, which we will look into more in the next few editions, but the answers to some of these questions could narrow down or determine which ‘color source’ or ‘chipset technology’ you will go with once you have decided on the laser or lamp dilemma. Before we move on, I’d scoot down to the ‘Vocab Test’ and refresh your memory on the 3 main projector technologies we see today in the Pro AV space.

Alright, on to the cheat sheet. To break it down as simply as possible, we’ve created a brief guide below.

Note: this is not the most comprehensive list of Pros and Cons, and like everything else in AV, it is subject to interpretation and experiences, but this can help those little light bulbs go off in your head when your customer starts describing their upcoming projects:

TECHNOLOGY VERTICALS BEST SERVED PROS CONS LASER OR LAMP?
1 or 3 chip DLP1 -Education
-Corporate
-House of Worship
-Bars/Restaurants
-Museums
-Large Venues
-Cinema
-Simulators
-Deep Blacks
-DLP uses mirrors to reflect light, so there is no degradation over time (aka longer lifespan)
-Minimal motion blur
-Doesn’t appear as bright as LCD
-‘Rainbow effect’ due to the spinning wheel in 1-chip models
Can be both
3LCD2 -Education
-Corporate
-House of Worship
-Bars/Restaurants
-Museums
-Large Venues
-Most cost-effective up front
-Higher brightness for comparably priced models
-Most portable
-LCD degrades overtime, causing brightness and picture degradation
-Motion blur can be an issue
Can be both
LCoS3 -Corporate
-Cinema
-Simulators
-Museums
-One of the best native contrast options
-Deep blacks
-Native 4k in most cases
-Heavier and not as portable
-Like LCD, LCoS can have an issue with motion blur in fast scenes
-Expensive
Can be both

In Edition 4, we will discuss the next step in our process once we determine lamp or laser, and which projector type (DLP, LCD, or LCoS) – which is determining placement of the projector, how bright we need it based on our room, and screen size. It will require some math, so bring your scratch paper. ✍️

QUESTION
I’ve noticed that sometimes projection screens aren’t always white. Sometimes they’re off-white, or gray. Why would that be?

ANSWER

I’ll answer your question by starting with a fun fact!The term “silver screen” was coined in 1920s when projection screen manufacturers and theater houses started using silver paint on screen surfaces. At the time they found that a silver screen made the images “pop” more, provided better contrast4 (very important in black and white films), and reduced blurriness and washing out of the images. This makes sense if you really think about how reflective the color white can be. If you’ve ever walked outside on a sunny day when the ground is covered in snow, you know how incredibly reflective and blinding pure white snow can be. Have you ever been blinded by the gray snow on the side of the road after the plows?

There’s really two advantages that come from using a screen that is gray instead of white. Firstly, by reducing the overall reflectiveness/reflectivity/reflection-factor of a screen, you can avoid the projected image from being blindingly bright (washout5). Well, in addition to combating washout, it can also help with ambient light issues. In the last issue, we covered how ambient light in the room can interfere with the projected light you actually want to see.

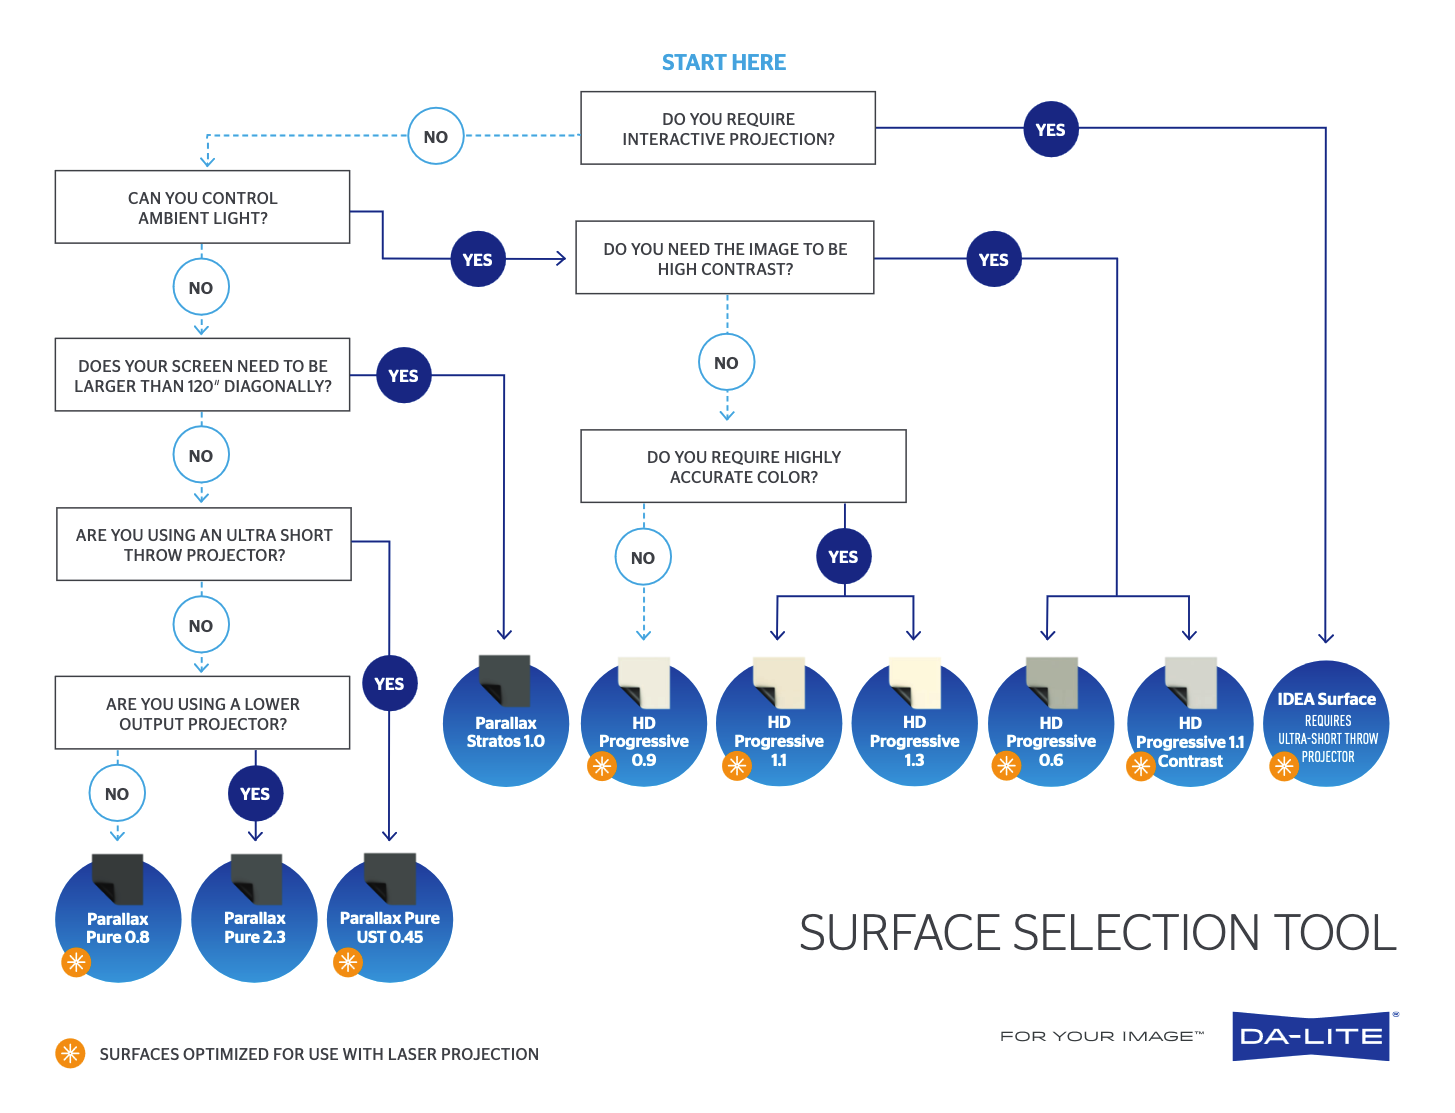
Another way combat that issue is by using a darker screen. The gray material will absorb the ambient light better and allow the desired light to shine (pun definitely intended) through. Additionally, just as in the 1920s, using a gray screen can help improve the quality of motion pictures. Technically speaking, projectors can’t project the color black. So, if you’re watching a dark action movie, like John Wick (which you totally should be, because it rules), then you’re going to want to be able see the action clearly and crisply. Having a darker screen will help the projector produce dark colors better, and allow for deeper contrast, which will help the action and figures stand out more clearly. Now, this isn’t to say that you should always use a gray screen, there are many situations in which a white screen will work just fine. surface-reflection-toolThe brightness of the projector, the projector technology being used (see previous question), the light in the room, the intended uses of the system, and the budget, are all key factors that you need to consider when building a projection system. The important thing is to make the right choice by evaluating all of the factors. There are many tools out there that can help you determine which screen surface is right for you. I personally like this one that our friends at Dalite have come out with 📽️ surface selection tool.   [click image to enlarge →]

Vocab Test Time!

Are these the most detailed definitions? No – we are not a dictionary, nor the AVIXA CTS Prep book. Will someone message us after still telling us how much we missed? Possibly. Will these get you a basic working knowledge of these terms and why they matter? We hope so. Plus, we are 99% sure they will help you impress your grandparents when you reset their WiFi.

  1. DLP – Stands for ‘Digital Light Processing,’ a type of chipset in display and projector technology that uses reflective surfaces/mirrors and color wheels to project light and color onto the screen.
  2. LCD or 3LCD – Stands for ‘Liquid Crystal Display,’ or ‘3 [Chipset] Liquid Crystal Display,’ which is a type of chipset that uses the white light from the source (lamp or laser) and reflects them through 3 light panels. The projector controls how much light passes through these panels to then create the image on the screen.
  3. LCoS – Stands for ‘Liquid Crystal on Silicon,’ which is a little bit of a mix between LCD and DLP technology. LCoS projectors use the mirrors of a DLP projector with the liquid crystal panels of an LCD to create bright, beautiful images, but without the ‘rainbow effect’ of DLP from the spinning color wheel.
  4. Contrast – A measurement/description of the differences between the white and black colors in a projected image.
  5. Washout – When the projected image is too bright or has too much white light is reflecting, detracting from the overall image quality.
  6. Wipeout– America’s Largest Obstacle course game show.

Thanks for Reading and Asking Your Questions!

Do you have more ‘dumb’ questions? Share your questions here and we will get you an answer.

Did you find this blog post helpful? Connect with us and #TeamExertisAlmo over on LinkedIn.

Ashley Nichols, Dir BizDev

Ashley Nichols | CTS, DSCE

Director of Business Development


Supported Manufacturers: Sony

John Borns, BDM

John Borns | CTS, DSCE

Business Development Manager


Supported Manufacturers: Legrand AV (NE, SE, MW) – Chief, C2G, Da-Lite, Luxul, Middle Atlantic, Vaddio, Wiremold

Edition 2 of “This May Be a Dumb Question, but…”

This Blog Series is written by Exertis Almo's Business Development Managers: 
Ashley Nichols, CTS, DSCE, and John Borns, CTS, DSCE.

Welcome back to the 2nd edition of “This may be a dumb question, but…”, a now recurring blog series where two industry ‘veterans’ (or newbies, depending on who you talk to) help you find useful answers to the questions you’re too afraid to ask. Our 1st edition went over AV over IP, HDBaseT and RS-232, so follow this link if you want to learn more about those topics. This edition is all about Projection, so let’s get to the questions:

QUESTION
What is the difference between all of the different projector technologies? I see 3LCD, DLP, LCOS, Laser, Lamp, etc., and I don’t understand what the difference is and when to use them.

ANSWER

Hot Take: Projection is more complicated than your basic digital signage display. Yep, I said it. So many variables go into projection and choosing the right fit for your application, so it is no wonder we received so many questions around this topic. First, we need to separate the two parts of this question: the light source or light engine, and what I will refer to as the ‘color source’ or chipset1 for the purpose of this blog. I will keep this as short and simple as possible, but the two parts of this question will be broken up in this edition, and then in edition 3.

The light source, in this instance, is when you are looking at a lamp vs. a laser projector. Though there are still lamp projectors manufactured today, many of the top projection manufacturers in the professional space are moving to a laser light source. Why is this? Though lamp projectors are typically less expensive up front, the overall cost and maintenance of replacing lamp bulbs over the life of the projector brings the cost near equal. For reference, let’s say ‘Lamp-Based Projector A’ is $1,500 MSRP, and ‘Laser Projector B’ is $2,600 MSRP. The average projector lamp bulb only lasts 2,000 hours (8 hours a day, 5 days a week for about a year), so you will be paying to change the lamp bulb almost yearly. Additionally, the brightness (or lumens2) begins to fade over the lifetime of the bulb, which negatively affects the image and overall color accuracy. I have broken a light bulb that was $1.50 when trying to change it in my ceiling fan, so I also would not trust myself as a client to change a $900 bulb in a $3,000 projector every other year, which means someone has to roll a truck4 to change the bulb, further adding to the overall cost of ownership.

Laser projector brightness, or lumens, will eventually fade as well, but it is a much slower transition, and typical laser projectors are made to run 8 hours a day, 5 days a week for around 10 years (or 20,000 hours) with as little degradation as possible. Laser projection also runs physically cooler than a lamp bulb, which allows for higher brightness projectors to have longer lifespans, since heat and electronics don’t typically play nicely together over a long period of time. In commercial settings (read: anything other than your backyard projector movie night) I’d recommend going with a laser projector for the cleanest, longest lasting option possible.

laser projection
QUESTION
I’m overwhelmed by the screen options out there. How do I know when to use each type of screen?
ANSWER

This is a great question. I was also completely dumbfounded when I first learned that projection screens were anything more than just a piece of blank white fabric. There’s actually a surprising amount of chemistry and sorcery that goes into each screen surface. If you’re going to buy tires for your car, you need to consider several factors to come to the right choice. Are you going off-road a lot? Do you need tires that can handle the snow? How often do you compete in underground drift races? Choosing the right screen requires a similar approach. Only by knowing the intended purpose of the projection system can you come to the right surface. In some cases, a standard Matte White5 screen will work fine. However, in many cases, using those screens will create some undesirable outcomes. I’m going to highlight two of the most common challenges we face in screen surface selection below. In a future post, we will look more into optimizing your screen surfaces to really get the best results possible.

  1. Laser Projection. Ashley just described all of the advantages of laser projection above. It’s not uncommon for an end user to upgrade to a laser projector without also upgrading their screen. This is a common mistake, and it can create some unfortunate consequences. A key concern is that here is an unwanted speckling effect when you use a laser projector on an older textured matte white screen (see image below). To solve this problem, many manufacturers have created tensioned screens with very flat surfaces. When upgrading to a new projector technology, it’s critical to also update your screen to one that is designed for that type of projection. Thankfully, our friends at Da-Lite have a screen surface technology chart available to help you with these questions.
  2. Ambient Light. Probably the biggest concern in projection is getting the system to be bright enough to get a quality image. You’re probably thinking that the best way to solve this issue is to just get a bright projector, and you’re not necessarily wrong. However, unless you have an unlimited budget (if you do, call me, I have some great ideas), that may not always be on the table. Other options here either are to use a screen that adds gain6 or to use an ambient light rejecting screen7. Screens that add gain use chemistry and witchcraft to make the screen actually appear brighter (usually done at the cost of limiting the viewing angle8). Ambient Light Rejecting Screens will block other wanted light sources (such as overhead light above the screen) from washing out the image. See Da-Lite’s Parallax screen below as an example. These are great options in rooms where there is a lot of sunlight or no controllable lights. Luckily, our friends at Da-Lite have a very handy screen brightness calculator to help you figure out the best screen for your space (notice a trend?). Again, we’ll explore some of the more application specific surfaces in a future post. There’s obviously a lot more to consider here.
laser projection

example of unwanted speckling effect on screen

ambient light

example of ambient light on Parallax screen

Vocab Test Time!

Are these the most detailed definitions? No – we are not a dictionary, nor the AVIXA CTS Prep book. Will someone message us later telling us how much we missed? Possibly. After reading this post, will you have a basic working knowledge of these terms and why they matter? We hope so. Plus, we are 99% sure they help you school your uncles while you play Trivial Pursuit during the holidays. 🎄

  1. Chipset – Another widely-used term that vaguely means a set of electronic components that are wired together on a circuit. You will hear this term in regard to projectors, displays, but also anything from PCs to cars, to the fancy $400 toasters on Amazon that have a screen to show you how ‘toasty’ your bagels can get. You will hear this term more in Edition 3 if you want to Google it now.
  2. Lumens – Basically, this is a measurement of the light visible to the human eye. If you Google it, you will see some of the below terms, as well as more knowledge into the specifics of this term.
  3. Lumière – Talking candle that lives in a mansion with a reclusive beast. 🕯️
  4. Roll a Truck – Fun way to say send out a technician to do a task in person, which translates into $$.
  5. Matte White – The most common, basic, and boring form of a projection screen. Probably what you had in your high school classroom.
  6. Screen Gain – The amount of additional brightness that a screen can add to the system. Usually measured as something like 1.1 or 1.3, which means that it can reflect back an additional 10% more brightness or 30% more brightness.
  7. Ambient Light Rejection (ALR) – Screens that have the ability to block out some or all light coming from top the screen. This means that sunlight or overhead ceiling light will not affect the projected image.
  8. Viewing Angle – A measurement of how far off to either side of the screen you can stand and still be able to see the projected image well.

Thanks for Reading and Asking Your Questions!

Do you have more ‘dumb’ questions? Share your questions here and we will get you an answer.

Did you find this blog post helpful? Connect with us over on LinkedIn.

Ashley Nichols, Dir BizDev

Ashley Nichols | CTS, DSCE

Director of Business Development

Supported Manufacturers: Sony, Panasonic and our OWN brands – Mustang

John Borns, BDM

John Borns | CTS, DSCE

Business Development Manager

Supported Manufacturers: Legrand AV (NE, SE, MW) – Chief, C2G, Da-Lite, Luxul, Middle Atlantic, Vaddio, Wiremold

Edition 1 of “This May Be a Dumb Question, but…”

This Blog Series is written by Exertis Almo's Business Development Managers: 
Ashley Nichols, CTS, DSCE, and John Borns, CTS, DSCE.

Edition 01 of Our NEW Blog Series

Welcome to “There’s No Such Thing as a Dumb Question” – a hopefully regular blog series where two AV industry “veterans,” with a combined nearly 2 decades of experience, attempt to create a safe space for people of all experience levels to ask basic questions, and get understandable and useful answers.

Have You Ever Been Too Embarrassed to Ask a Question?

The AV industry is filled with jargon, acronyms, and experiential knowledge. If you’re anything like us, you’ve found yourself in conversations where you’ve had absolutely no idea what was going on.

If you’ve felt this way before, this blog series is for you!

Who Are We, Exactly?

We’re Business Development Managers (and buddies) at Exertis Almo. Prior to our time here, we broke into the AV industry working for a manufacturer. We both started in our 20s with absolutely no AV experience whatsoever. We worked in sales and had intimidating conversations with people who basically invented the industry – and we had to figure it out on own by asking a bunch of “dumb” questions.

Our Goal is to Open Up the AV Conversation

Our goal here is to give newcomers to the AV industry and fellow ‘veterans’ alike the knowledge and confidence to have conversations with more seasoned industry professionals – without feeling like you’re speaking different languages. We welcome all questions, whether or not you’re already certified! And if you already have your CTS-I/D, you’re welcome to contact us about topics we’re not explaining well enough. But enough about us, let’s get to some questions!

QUESTION
What is the difference between HDBaseT and AV-over-IP (sometimes called AVOIP)?

ANSWER

Did you know that video signals have length limitations? The signals can only be carried along their standard cables so far before the signal deteriorates or drops off completely. Both HDBaseT and AVOIP are ways to carry standard video signals over longer distances. They do this using magic black boxes (not black magic 😉✨) that convert the signal into a new format.

The source of the confusion comes from the fact that both HDBaseT6 and AVOIP use category cables1 to do the trick. In the case of HDBaseT, that category cable is dedicated between one video source and display. One box goes near the video source (camera, Blue-Ray Player, PC, etc.) and the other goes near the display. The 2 are connected by a category cable, allowing for the signal to travel greater distances (up to 100 meters). AVOIP7 operates similarly, using category cables and black boxes as well, the difference being that some of the boxes act as ENCODERS, which is a cool way of saying that they put your video signal onto the network. It then lives on the network2 waiting for a DECODER to come looking to it. The DECODER will find the network-encoded video signal and allow it to be displayed. Additionally, a PC or other network enabled devices can act as decoders as well and find that ‘encoded video signal’.

network cables
control panel
QUESTION
How does RS232 control work, and what do people use it for?
ANSWER

My father-in-law has an expensive, high-end universal TV remote which he is entirely too proud of. It has a little touchscreen on it, and it can control his TV, stereo, Blue-Ray player, and 30-disc CD changer (for real 🎛️). When he got it, he had to spend a bunch of time getting the remote controller to “learn the codes” for all of the devices so that his one remote could control them all. Luckily, all of those devices use an IR signal5 for their different control functions. In Professional AV systems, RS2324 is very similar, except instead of being an IR-based signal, it’s a hardwired signal. And instead of a fancy little remote controller, it’s all operated by a control panel. Once all of the devices are wired to the control panel, you can go into the manuals of each product and program the various control codes into the controller. This will now allow you to turn on the projector, lower the screen, adjust the volume, change the channel, etc. of the various devices you have connected.

Fun Fact: One of the features that typically separates a professional display from a consumer display is the inclusion of an RS232 control port.

Vocab Test Time!

Are these the most detailed definitions? No – we are not a dictionary, nor the AVIXA CTS Prep book. Will someone message us later telling us how much we missed? Possibly. After reading this post, will you have a basic working knowledge of these terms and why they matter? We hope so. Plus, we are 99% sure they will come in handy at ‘Wednesday Night Trivia’ sometime at your local brewery. 🍻

  1. Category Cable – a.k.a. Ethernet cable, a.k.a. patch cable, a.k.a. Network cable. ‘Category’ cable comes from determining the capabilities of the cable, such as bandwidth. Examples you probably have seen are Cat5e, Cat6, etc.
  2. The Network – An ambiguous term that distills down to this: two or more computers or devices that are linked together and are able to share information with one another. We will have another more in depth segment on this.
  3. The Net’ – 90s movie with Oscar Winner Sandra Bullock running from assassins plotting nefarious deeds.
  4. RS232C – RS stands for ‘Registered Standard’. It is a ‘standard’ control protocol that many devices recognize and is used to command these devices to do things like turn on/off, change volume, schedule timers, and more.
  5. IR Signal – Yes, we are talking about that stuff you learned about in Chemistry. ‘Infrared’ signals are used for many devices to control them (think TV remotes). Different devices respond to different IR signals, which can be ‘coded’ to tell them to do different functions.
  6. HDBaseT – The AV industry standard ‘brand name’ for HDMI extension over category cable (think Kleenex vs. Tissue).
  7. AVOIP – AV over IP, a.k.a. Audio-Visual over Internet Protocol

Thanks for Reading and Asking Your Questions!

Do you have more ‘dumb’ questions? Share your questions here and we will get you an answer.

Did you find this blog post helpful? Connect with us over on LinkedIn.

Ashley Nichols, Dir BizDev

Ashley Nichols | CTS, DSCE

Director of Business Development

Supported Manufacturers: Sony, Panasonic and our OWN brands – Mustang

John Borns, BDM

John Borns | CTS, DSCE

Business Development Manager

Supported Manufacturers: Legrand AV (NE, SE, MW) – Chief, C2G, Da-Lite, Luxul, Middle Atlantic, Vaddio, Wiremold

Pin It on Pinterest